
Sourdough is one of those things that seems to have about as many methods as there are people who make it. And when you’re just starting out, the sheer volume of information online can be overwhelming. Although I have utmost admiration for those who are super precise with their sourdough technique…. that’s not something I realistically am going to do on the regular. Not on top of everything else I have to do in a given day. Enter this easy sourdough bread recipe, a.k.a., sourdough for lazy people. 🙂
This easy sourdough bread recipe is not a high-end, exacting method. But it’s one that fits easily into my day-to-day schedule. It requires little complicated scheduling and constant starter feeding, and consistently produces a lovely rustic loaf that suits our day-to-day needs. And the best part? Once your starter is established (more on that later) you won’t have any discard using this method.
Sourdough bread baking has been around for about as long as humans have been growing and eating grain. That means countless ancestors were making their own naturally fermented bread long before food scales, refrigeration, or even clocks existed. Advanced sourdough making is certainly its own art form as well as science. But at the end of the day, you really don’t need a ton of time, expertise or fancy equipment to make a delicious, healthy sourdough loaf.
What makes this method so easy?
What makes this easier than other sourdough recipes I’ve come across? Most sourdough recipes will advise you to feed your starter several hours before you prepare your dough. However, I mix mine straight from the fridge using an unfed starter. This has two benefits. One, I don’t need to remember to discard and feed it, wait awhile, and then mix my dough, only to have to wait a bunch again for it to rise. Automatically, that shaves a lot of time and hassle off of the process.
Here are some other key differences from most common sourdough methods:
- I don’t use a food scale, just simple measuring cups. (Sourdough sacrilege, I know.)
- I skip the stretch and fold step, and still get great results.
- I mix it right before bed, and it’s ready to bake the next morning.
- I bake it in a Dutch oven, which removes the need for a bain-marie (pan of water) inside the oven.
- I also proof it in said Dutch oven, so there’s no need for extra proofing baskets or bannettons.
I recognize more serious bakers might think I’m a lunatic, but all of this works just fine for my purposes. 🙂
Sourdough baking without discard
The other benefit of mixing straight from the fridge is a big one: no sourdough discard! If you’ve ever worked with sourdough, you know that you need to discard some of the starter before each fresh feeding. All this discard can quickly add up and become wasteful. Of course, there are ways to use it up in other things like pancakes or cupcakes. But if you’re not already making stuff like that on the regular, it can add yet another barrier to regular sourdough making. By mixing dough with starter straight from the fridge, the “discard” goes into your bread, not the trash.
Another thing you’ll almost always see in sourdough bread recipes is a step called a “stretch and fold.” This basically involves stretching the dough over on itself a few times within the first hour after you first mix it. The principle is that doing this helps to develop the gluten strands for an airier loaf. I was diligently doing stretch and folds every time I baked, until one day I forgot to do so before going to bed. I was worried that my unstretched dough would produce a dense, tough loaf, but I’m not one to waste food, so I baked it anyway. Sourdough aficionados might take issue with me here, but… I really didn’t notice any difference in the final loaf. So now I skip that step too. Hooray! So simple!
Making The Starter
In order to make sourdough bread, you’re going to need sourdough starter. This means cultivating an active, living community of wild yeast in a jar. Yeast is all around us, so by offering it food in the form of flour and water, you invite the yeast to move in and multiply. Cool, right? I began my sourdough starter the week that Brendan and I first moved into Sky Meadow. It’s now almost two years old! (And, in keeping with sourdough tradition, I named my starter — she’s called Lucinda.) I love that I’ve “grown” it here. Working with it is part of my ongoing friendship with the land I live on. In the interest of keeping this article focused on the bread recipe itself, I’m not going to go through the whole process of making a starter here. This is a good link to refer to for how to do that.
Making your own starter is not at all difficult, but it does require diligent daily maintenance for a few weeks to get it established. You can also find dehydrated starter from another source, perhaps a friend who bakes, or a local community forum, or purchase it online. There’s even a website that offers some of a starter purportedly dating back to 1847 for free — you just pay postage!
Maintaining the Starter
Once your starter is established, it can be kept in the fridge for a week or more at a time without issue. I’ll be honest, I sometimes use it after a month, and it still does fine. It does depend on your starter, but just remember, simplicity is key. Don’t overthink it. Channel the ancestors! The acidity of the environment (specifically, lactic acid created by lactofermentation, similar to sauerkraut), combined with refrigeration, keeps pathogens at bay. If I notice it’s been awhile since I have used my starter, I can either discard a little and then feed it, or — my preference — make a loaf of bread and then feed it. They are surprisingly hard to kill, and even a severely neglected starter can usually bounce back with a few extra feedings.
A healthy starter’s acidity levels are high enough to keep “bad” bacteria at bay, which is why it doesn’t spoil and remains safe to consume. It should have a slightly sweet and tangy smell (nothing funky or musty), uniform color and consistency, and no signs of mold, pink slime, or green or black discoloration. Always handle your starter with clean hands and clean tools to avoid accidentally introducing some unwanted bacteria to a healthy culture. And if your starter smells truly rancid or moldy, or you notice discoloration or fuzz, trust your gut and don’t use it. The nose knows.
If your starter has been sitting for awhile, you may notice a grey-brown liquid on top that smells alcohol-ish. This is “hooch” and it’s indeed a form of alcohol that the yeast creates after metabolizing the flour. It just means that the yeast has used up all the available food in the jar, and needs to be fed again soon. You can simply pour off the hooch and then feed or use your starter again as normal.
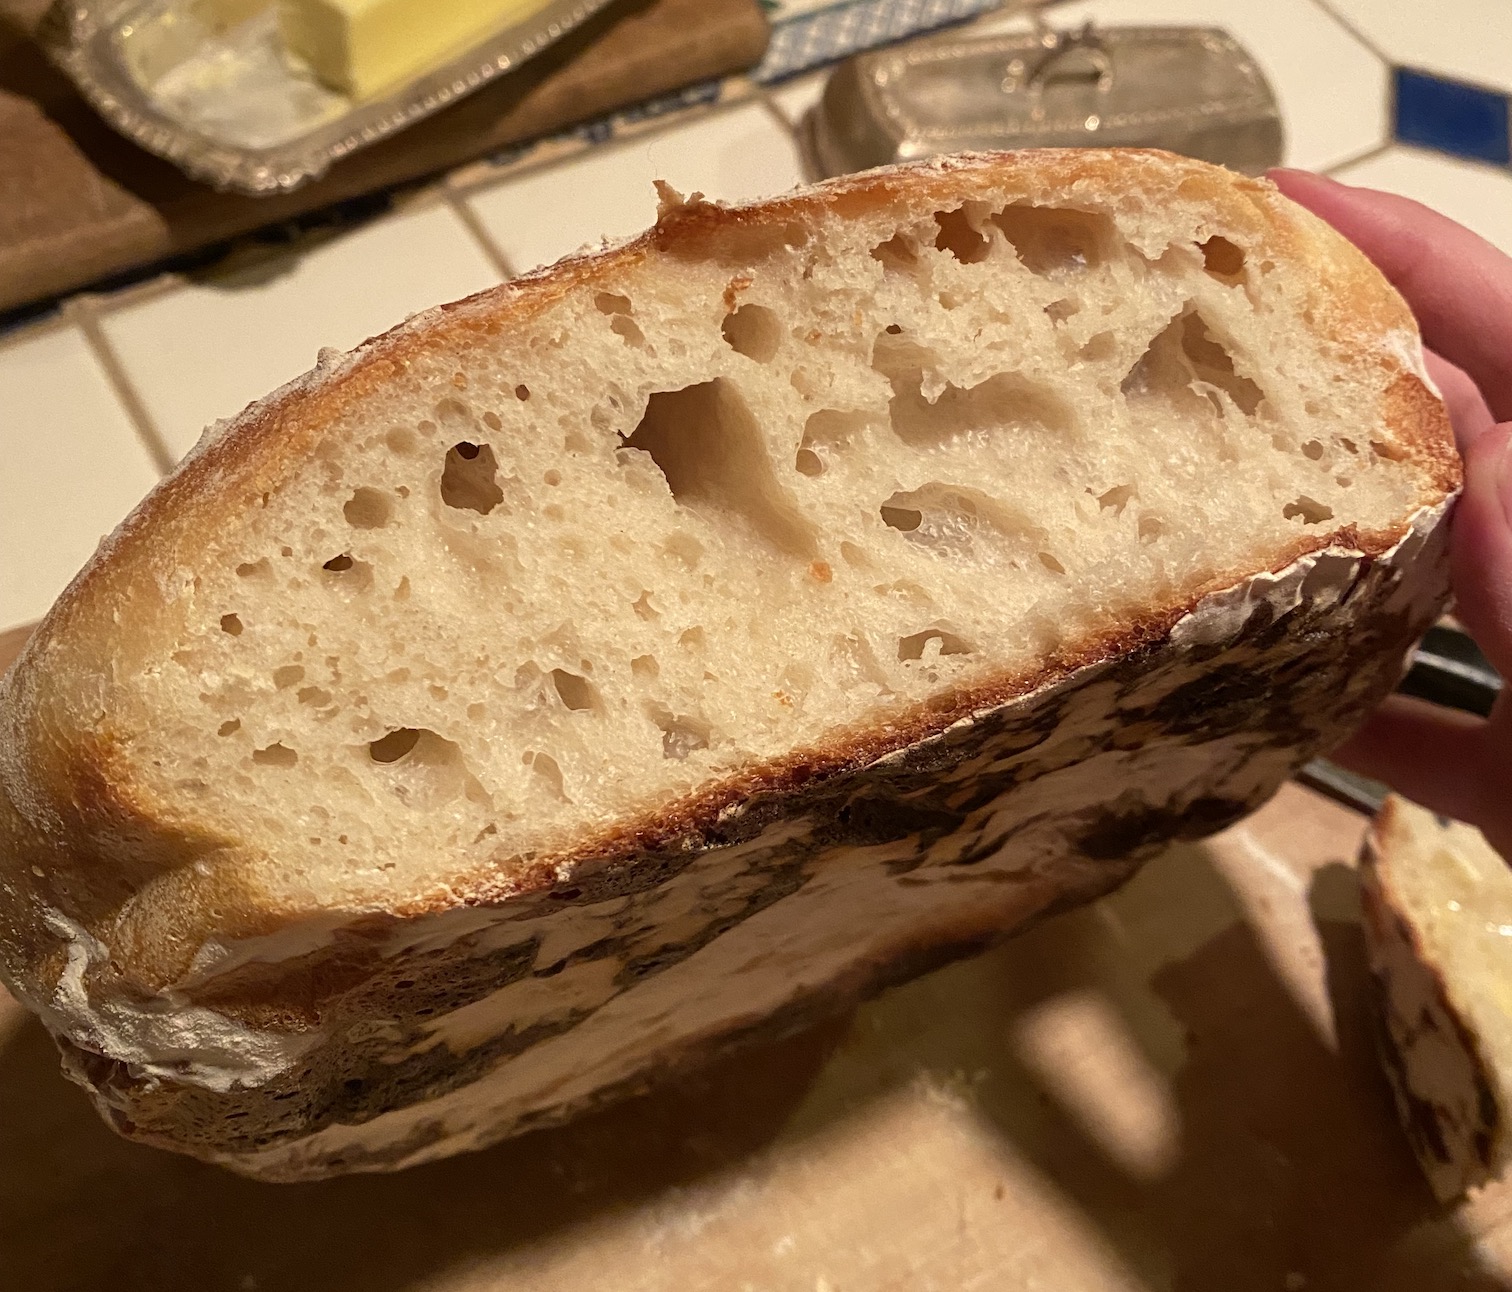
My favorite part of this method is its simplicity. I’ve made it so many times I barely even measure anymore. I’ve learned from experience how the dough needs to feel to produce the result I want. A wetter dough will be weaker and harder to work with, but tends to produce larger air bubbles. A drier dough is much easier to work with, but bakes up much denser. The recipe below is what consistently gives me equilibrium between the two.
I know my folk method is not the fanciest. But I love being able to bake up a glorious-smelling loaf of homemade, naturally fermented bread as if I’m just making a cup of tea. To me, that’s one of the moments I feel truly rich. 🙂
Easy Sourdough Bread Recipe
The Ingredients
- 3.5 cups bread flour (I highly recommend the King Arthur brand)
- 1.5 cups water (tap water is okay as long as it does not contain chlorine)
- 1/3 cup sourdough starter
- 1 Tbsp kosher salt
- Any other flavorings you’d like (see note)
Note on other flavorings: This easy sourdough bread recipe works well with additional herbs and spices for different flavors. I love using dried rosemary and fresh minced garlic for an Italian vibe. I might also add a few scoops of a medicinal mushroom powder like Sacred 7 for a pumpernickel-hued “super shroom” sourdough. For a softer and slightly sweeter bread, you can add 1-2 T of olive oil and 1-2 T of honey or maple syrup. Other potential mix-ins or toppings could include chopped olives, caramelized onions, and parmesan cheese. Or go a sweeter route with pumpkin spices, cinnamon and/or raisins. Just be sure to decrease the amount of water if your flavorings have a lot of liquid in them.
The Method
1. The night before you want to bake your bread, mix up your dough. You can do this by hand with a large spoon and a mixing bowl, or use a stand mixer with the dough hook.
2. First, measure your flour, salt, and any other optional flavorings into the bowl and whisk to combine.
3. In a measuring cup, measure out your water, then add in your sourdough starter and stir to combine. Pour the starter/water mixture into the bowl with the flour and salt.
4. Mix with a wooden spoon or with the dough hook attachment on your mixture. The dough should be somewhat sticky, but able to pull away from the sides of the bowl. If it’s stickier than that, add a little flour at a time until it reaches that consistency. Mix it just until everything is combined and there’s no dry flour anywhere in the bowl. There is no need to over-mix or knead the dough.
5. Cover the bowl with a damp tea towel and set aside to rise overnight. If your house is quite warm, it will likely be ready to bake as soon as you wake up. If it’s on the cooler side, it may need a little longer. One way to know if your dough is ready to bake is the “poke test.” With clean hands, slightly flour one of your fingers and poke the dough in about an inch. If the dough immediately bounces back, it needs to rise more. When it maintains the indent, but still gives a bit of resistance, it’s perfect. (If it feels totally weak and deflates beneath your touch, it may be overproofed. It’s okay though! Still bake it. It might not rise as much in the oven, but it will still taste delicious.)
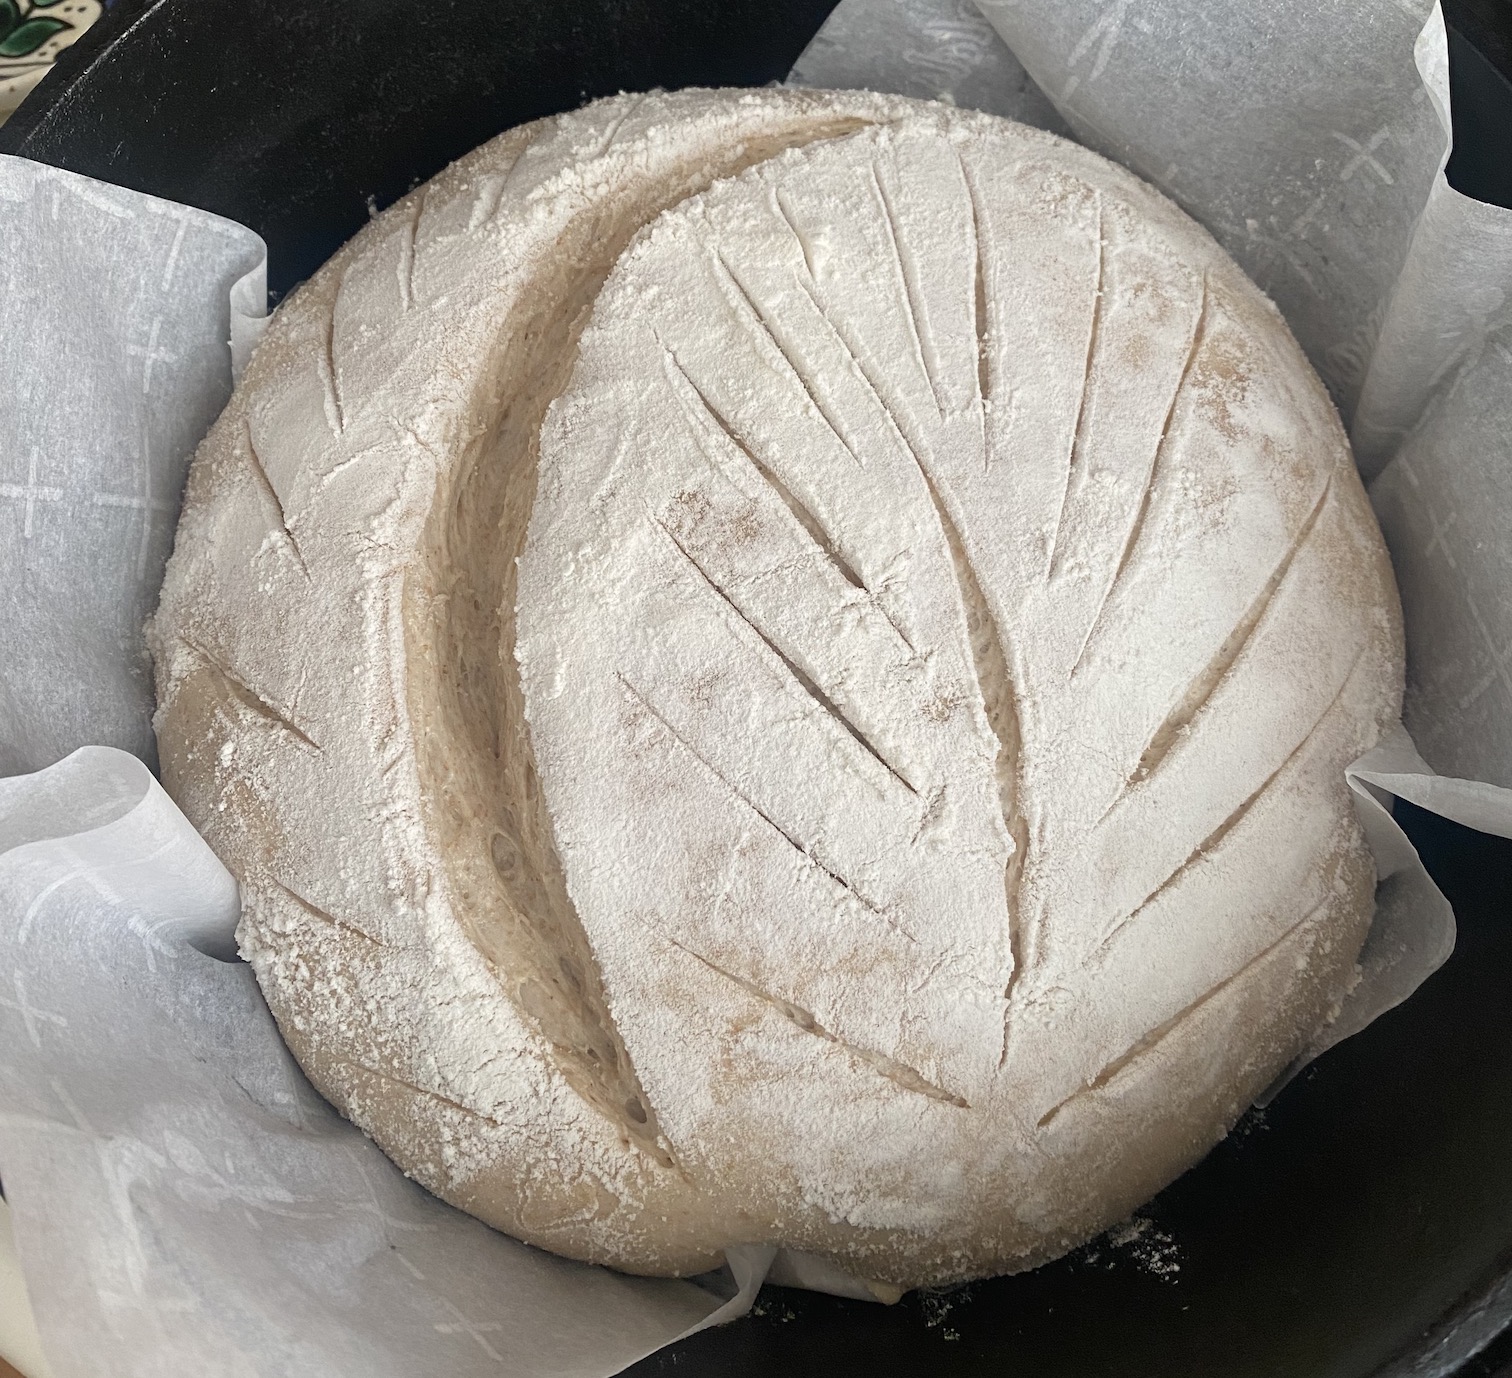
6. When the dough is ready to bake, shape your loaf. Scrape it onto a lightly floured surface and shape it into a boule, or round. (This is a short and easy to follow guide for shaping.) Place it on a piece of parchment paper, add a little extra flour to the top, then drop it into your Dutch oven and put the lid on.
7. Leave your loaf to proof in the Dutch oven for another 1 hour (in a warm house) or 2 hours (if it’s on the cooler side).
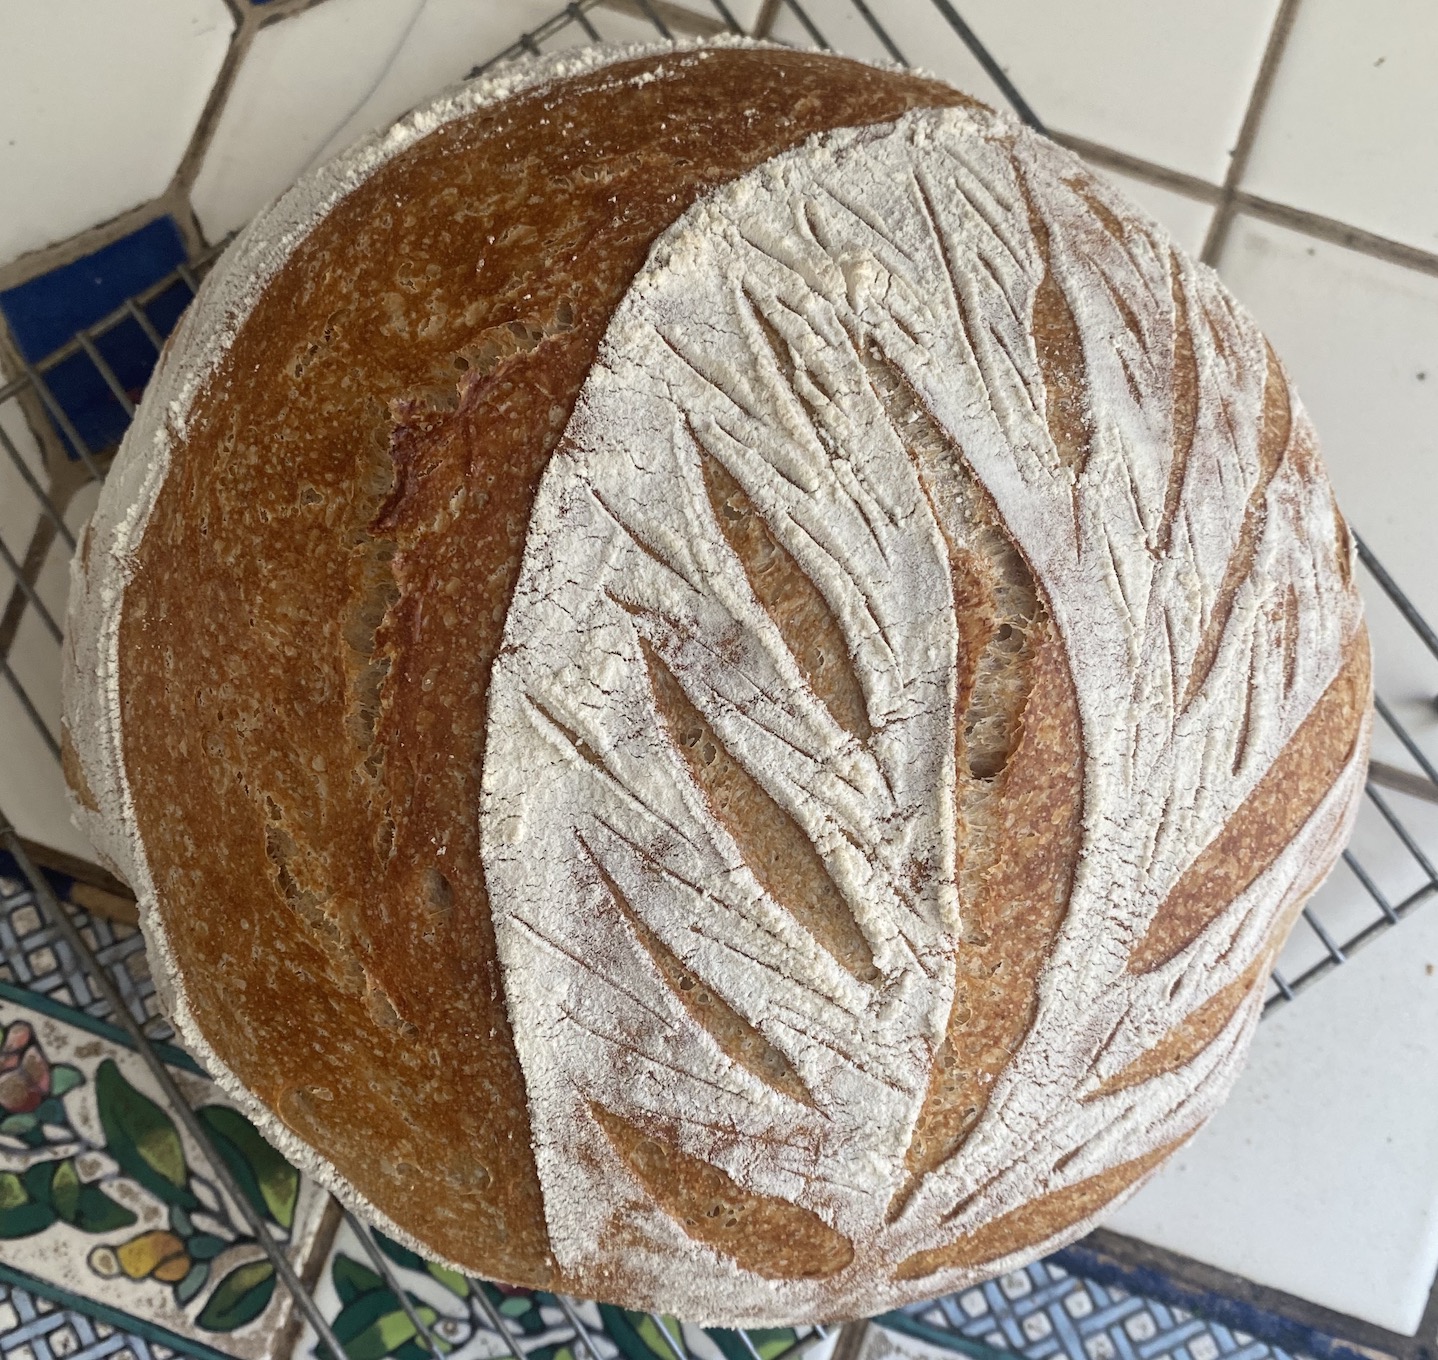
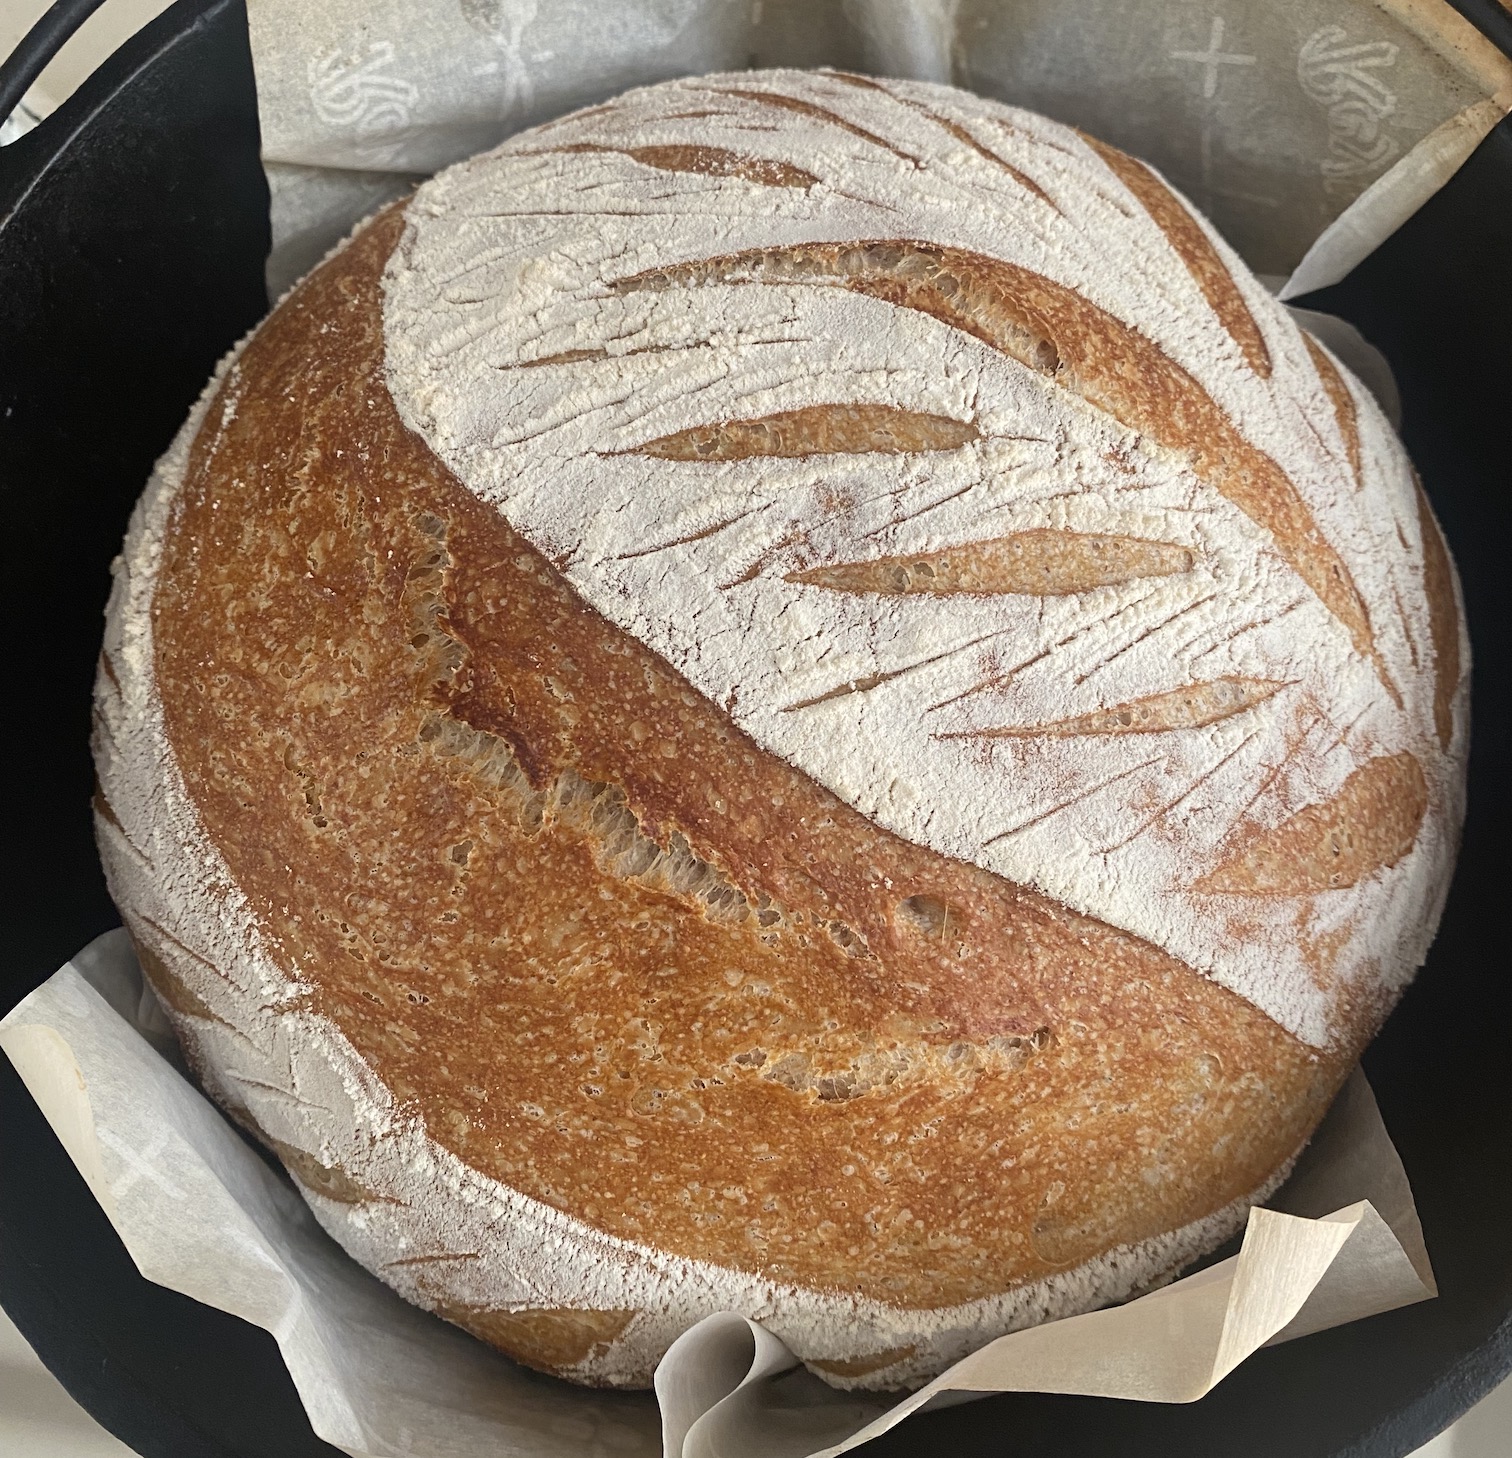
8. Once the dough has proofed, preheat your oven to 425 degrees F. Now it’s time to score your dough. Not only does this make for a prettier loaf, it’s very important to give the steam from the baking process somewhere to go. Otherwise you’ll end up with unsightly “blowouts” in the bread where the crust can’t hold in all that air, and ruptures. I like to do one deep crescent-shaped cut, and then freehand a little design with shallower ones. Whatever design you do, make sure you have at least one nice deep score. There are many, many designs you can do. Here is a video showing a few simple ideas.
9. Once your dough is scored and ready to go, pop it in the oven. Bake it with the lid on for 25 minutes. Then, remove the lid and continue baking for another 5-10 minutes until the top is golden brown to your liking and the crust is crisp.
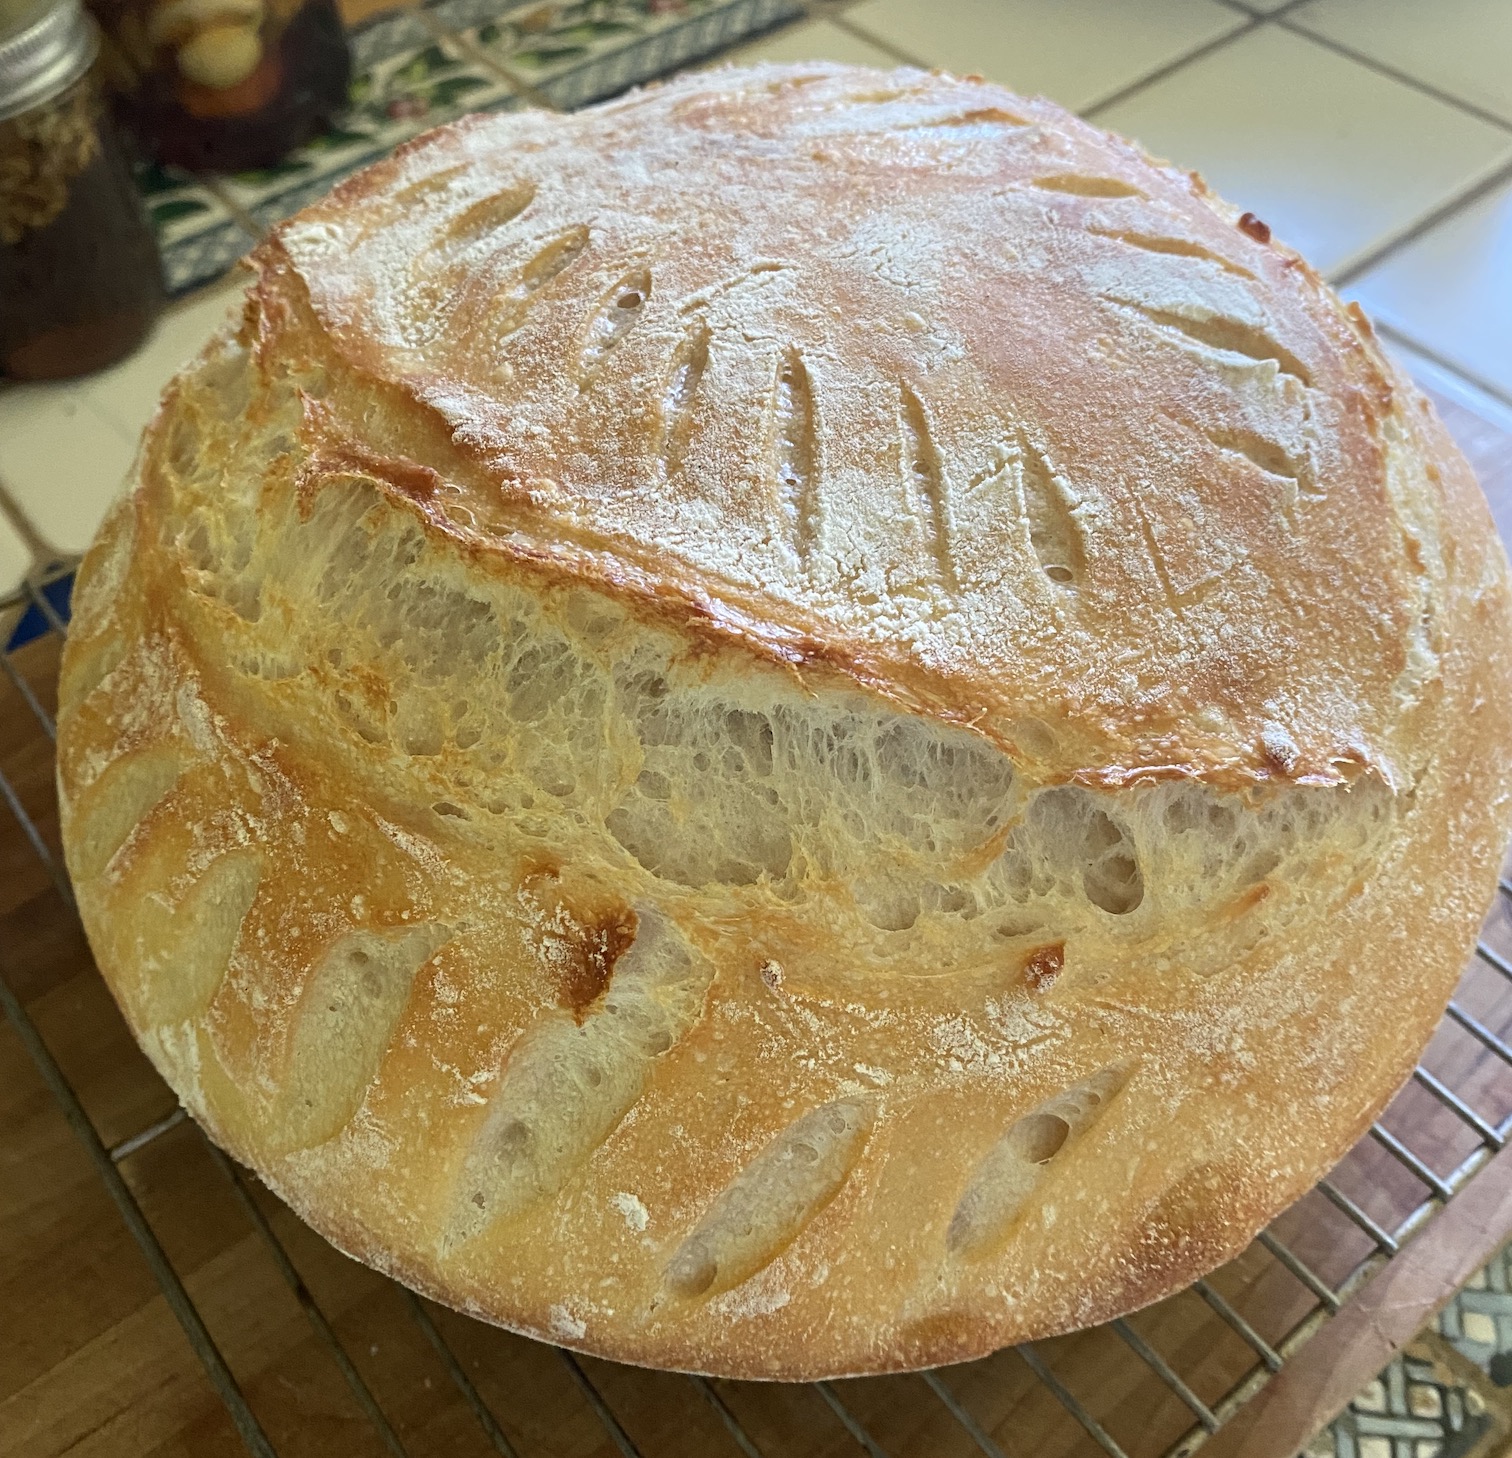
10. Remove from the oven, then use the parchment to lift the dough out of the Dutch oven. Transfer to a wire cooling rack and allow to cool for at least 20 minutes before slicing. (I know, it’s hard to wait.) Enjoy!